How to make your own DIY Christmas wreath
DIY WREATH KIT CONTENTS: (we will have wreath kits online from November but otherwise you can find most items locally )
- Greens : fir, eucalyptus, pine
- Gloves to handle moss
- Oranges, cinnamon, pine cones , whatever you want to decorate your wreath with
- Ribbon
- Wire string
What you need :
You will need a secateurs or pruners to cut your greenery and a small wire cutter of pliers to cut your wire. Don’t forget to protect the surface underneath your wreath to prevent scratching or damage from the wire or greenery !
Step 1 : Prepare your greenery
First, you’ll start by organising your greenery by variety so you can clearly see what you are using and the height/length of each stem.
Once this is done, cut and arrange all of your materials into bunches of 4/5 stems. You will need between 12 -15 bunches, depending on your mix. Think of your mix as a pattern. Use the fir as your main base foliage as per below.


Organise each bunch into a fan shape with the highest point of the bunch to the right and the smallest at the left. This smallest stem on the left will form the inside of your wreath.
If you want a very structured, symmetrical wreath, make
each bunch more or less the same . If you’d like a wilder, more “natural
looking” wreath, cut your branches into a variety of pieces ranging from 4-8
inches and vary the mix in each bunch. There is no right or wrong way. Test out which pattern or mix you like best. Feel
free to add your own greenery or pieces into the mix. Feathers, dried flower
material, seed heads can be added for extra interest– as long as they are sturdy
enough!
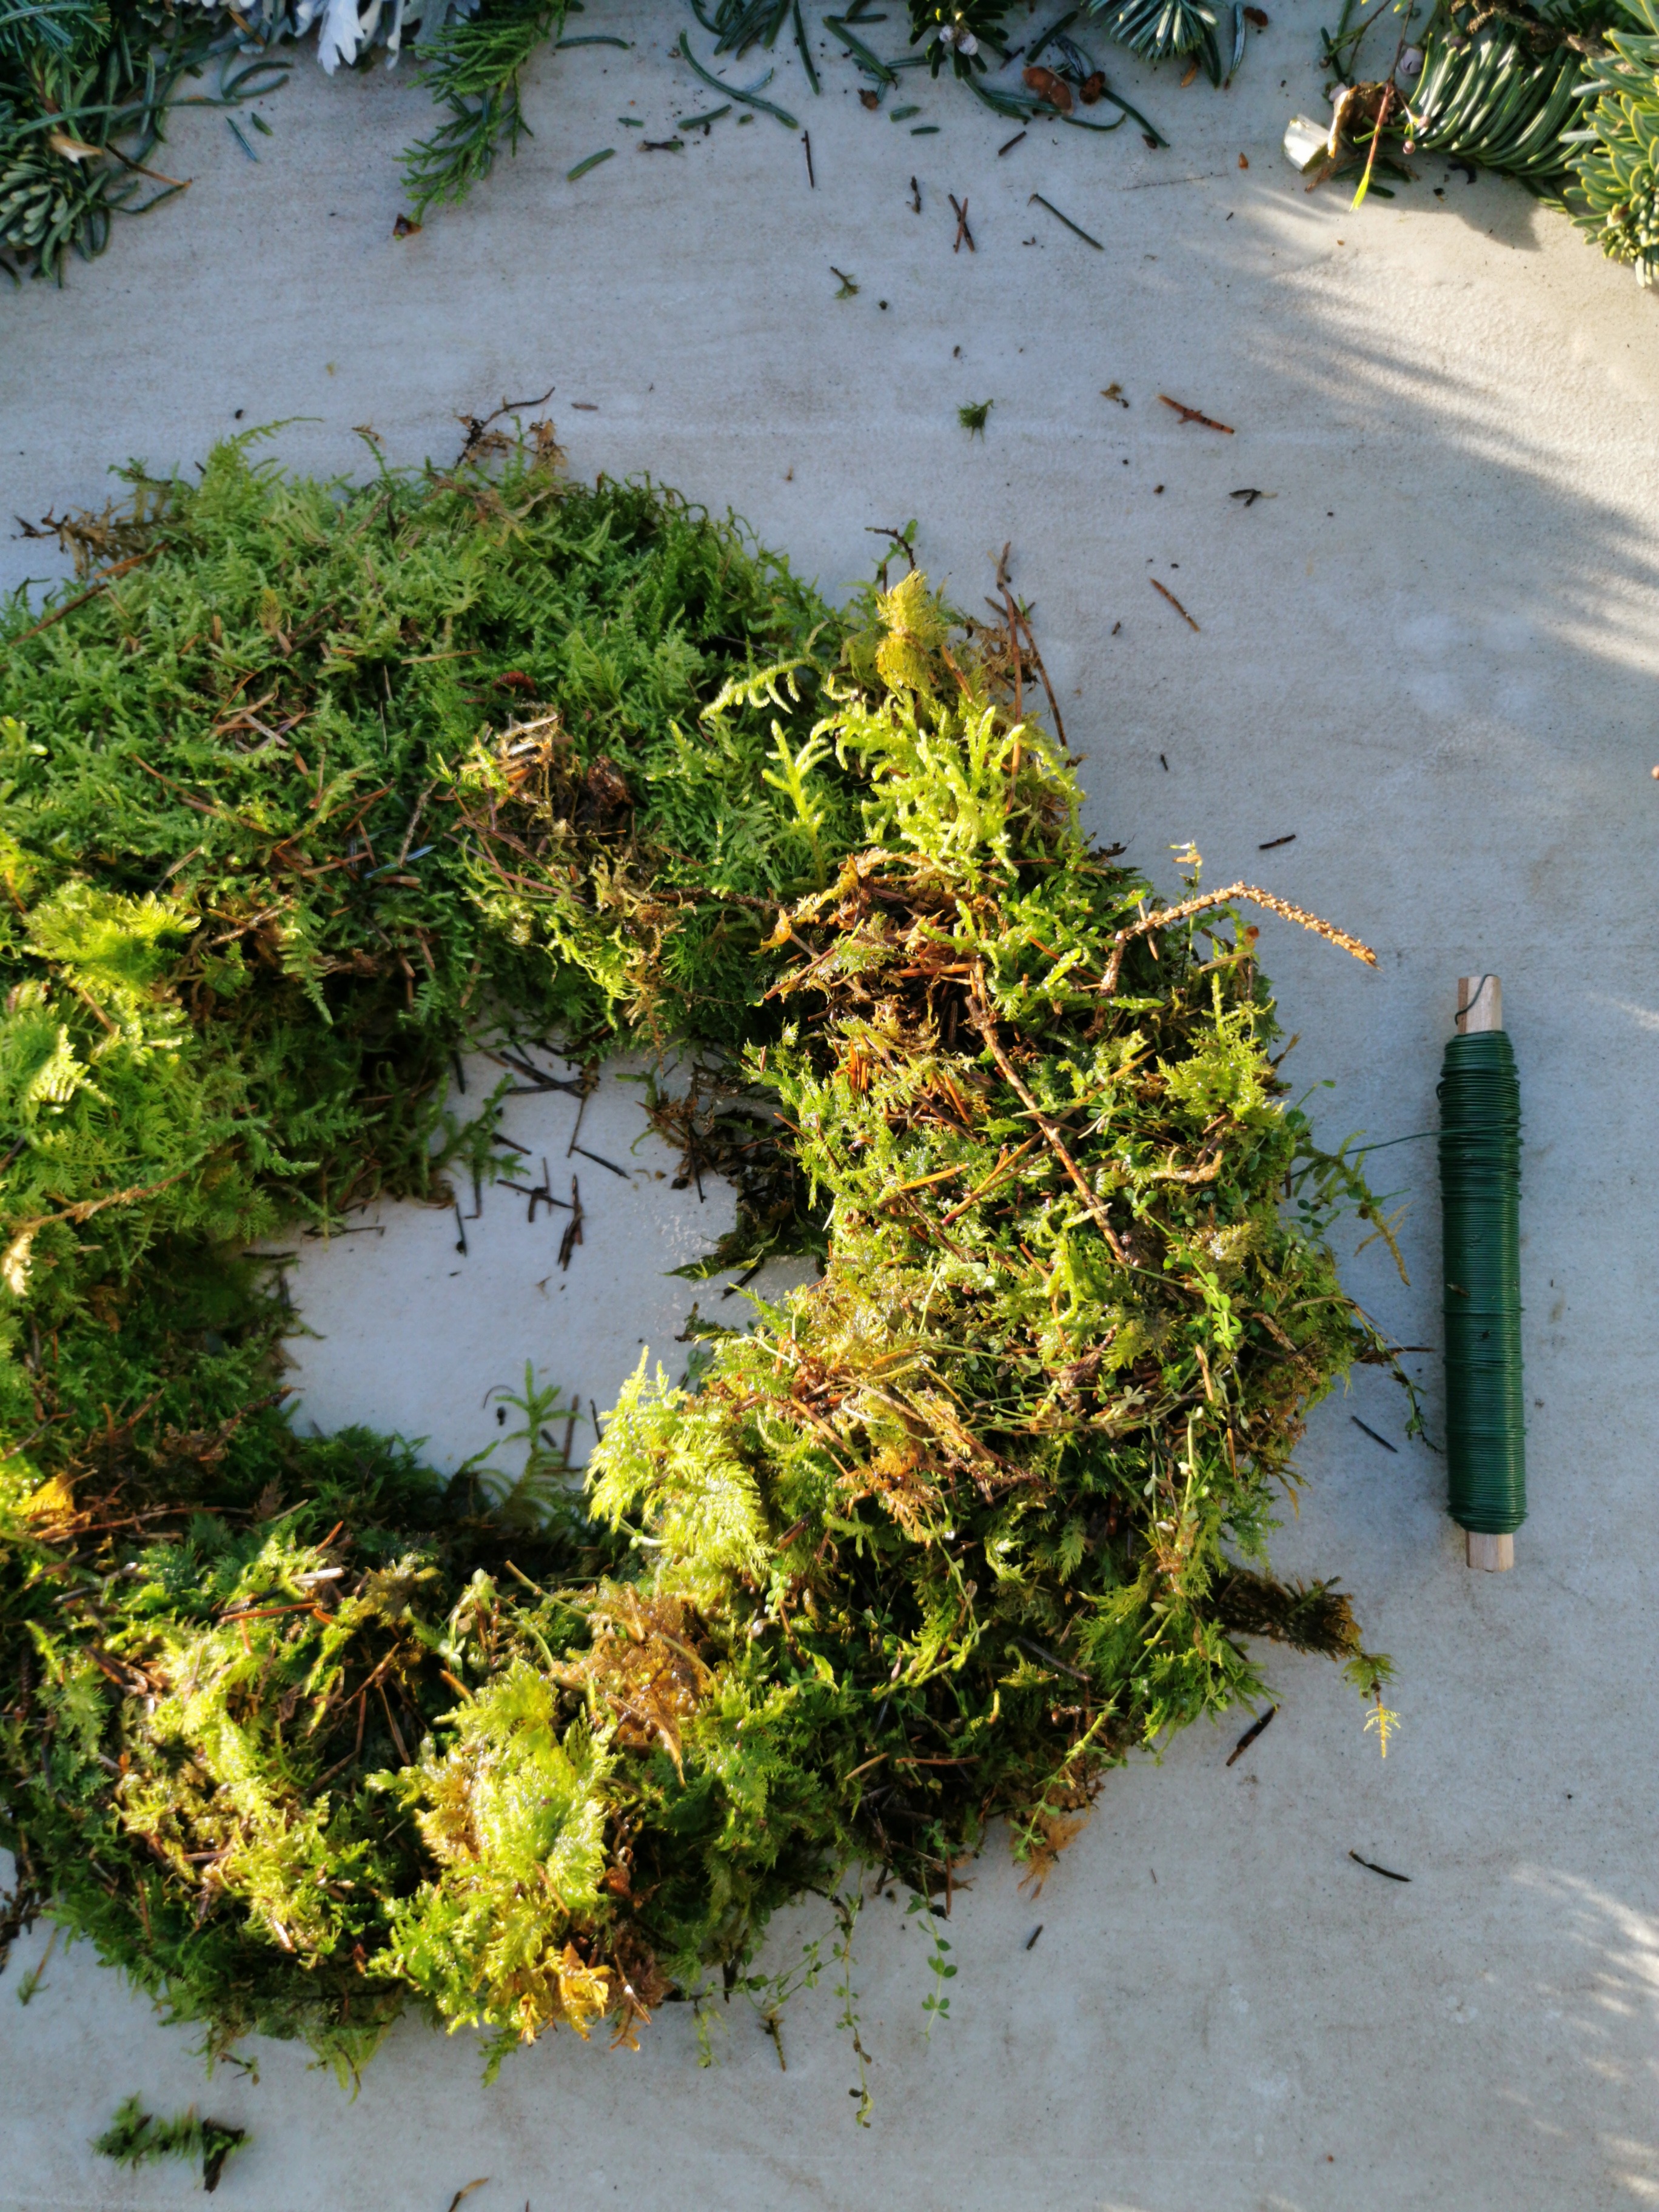
Step 2 : CREATE YOUR OWN MOSS BASE
Now you’re ready to assemble your DIY wreath! Grab the small roll of green reel wire and attach it to the frame securely as below. It is really important that this is really tight to the frame and the wire is secured along the top of the wreath frame and won’t stick out the back and scratch your door. If you are finding it hard to tie the wire, simply criss-cross the wire and twist so that it secures the wire together to the frame.

Position you reel wire to the right (if you are
right handed or left if you are left handed). Think of your frame as a clock –
the reel wire will always be positioned at 3 o’ clock (or 9 o’clock if you are
left handed).
Next, grab your gloves and your bag of moss. Use the gloves when handling moss to protect your hands from thorns and cuts. NB. Always make sure to wash your hands entirely after handling both moss and the foliage.
Shake out the moss to ensure no pieces of sticks are present. Start arranging your moss evenly around the wreath frame in a doughnut shape around the wire frame.

Just as a note in relation to the environment and sustainability which is really important to me as a flower farmer florist. If you are foraging moss, please be really mindful where you forage from and take it only the amount you require. I love using moss in my floral work – especially in wedding work along with chicken wire. I create my moss bases and then I reuse my moss bases over and over again. Please don’t use oasis or green floral foam as there are lots of options to make a really beautiful wreath without using a plastic material. Floral foam isn’t recyclable and breaks down into tiny microplastics which will remain in the environment and harm aquatic life and waterways long after we have left this mortal coil! Scientific studies also now show that floral foam can have an impact on respiratory systems in humans, so steer clear!
You can use straw or even leylandii greenery as a base too. Both materials will create a nice raised rounded doughnut shape when placed similarly to the moss shape below. You can also just a really strong garden twine or string and a willow base or any branches that can be shaped easily and tied together to create a fully compostable, biodegradable wreath base.
Once you have this done, start binding the moss to the frame but pulling it up and over to the centre part of the frame. Gently lift the wreath to pull the wire out underneath back into the 3 o’ clock position and pull the wire tightly to create a tension on the wire and keep the moss secure.
Start by binding the wire over and around the wreath ; for the first round do it at a wide spacing just to get the basic shape. Continue to go around the whole base at least 3 times until the moss is really tightly secured to the wreath wire frame. The wire should feel really tight and secure. Cut the wire leaving a piece of at least 10-15 cm and ‘thread’ it or tie it into a knot or twist it into the bottom/back of the wreath wire frame until it is secured around the frame and will not move. Make sure to tuck the end of the wire into the moss base so as not to scratch your hands or your door.

Finish off your moss wire by cutting the wire and tying tightly to the wreath frame on the bottom.
Step 3 : ADDING YOUR GREENERY BUNDLES
Next get your reel wire again and tie it back onto the wreath frame again, starting in the 3 o’ clock position again wrapping or binding it around your moss base at least twice and pulling it tightly. You are now ready to add your greenery. Grab your first bundle and place it in a 12 o’ clock position on the side of your wreath directly over where you reel wire has been tied. Hold the bundle with your left hand and proceed again by bringing the reel wire over the top of the moss base and into the middle or centre part of the wreath and pull the reel wire back underneath the wreath – pull the wire tightly to create a tension and wrap the wire at least twice or three times around the bundle securing it tightly to the moss base. Now move your wreath a slight bit anti -clockwise leaving your reel wire at 3 o’ clock. Grab your second bundle of greens and place it direct and centre over the wire of your first bundle -again position it that the bundle is facing to 12 o’ clock. Wrap the wire securely and continue to this the whole way round the wreath. This tension is what holds your wreath together. Keep in mind, the greens and branches will dry and shrink during the weeks your wreath hangs on your door or wall, so don’t be afraid to give that wire a good, tight pull!
OVERLAP GREENERY BUNDLES, ONE BY ONE


It is really important that you keep you wire tension really tight the whole way round. Remember that your greenery will start drying out and shrinking over time so this is really important. If you are not sure if it is tight enough, check your bundles you have tied and see if they feel nice and tight along the wreath base.
Wrap the wire securely and continue to do this the whole way round the wreath. Keep moving the wreath a little bit anti-clockwise before adding your next bunch to keep a nice shape to your wreath. Every once in a while, step back and hold up your wreath to see if it looks full and balanced.
STEP 3 : TIE OFF YOUR WREATH


Once you get to the end of the wreath, get your last bundle of greens and using one hand, gently lift up the top of the very first bundle you tied on and slide that last bundle underneath the stems onto the base of the wreath and again wrap the wire around the wreath really tightly 2 or 3 times . If you are happy that is secure, cut the wire leaving about 10-15cm of wire so that you can again wrap and tie or ‘thread’ the wire into the wire frame underneath and couple of times and then tie it or twist securely.

Again tuck the end piece of the wire back into your moss base. Once you have the wire really tightly knotted in and secured, lift up your wreath and check underneath to check the tightness of your wiring. If you do find a loose piece of wire, simply pinch the centre part of loose wire together and twist it gently a couple of times to create a tension on the wire.
Now review your shape of your wreath. If you see any gaps in the wreath, grab some of your leftover foliage, cut the bottom of it at angle into a spear shape and simply slide it into the moss base directly under the bunches or into the middle of the bunches – just make sure that it is well secured into the wreath. You can always trim off any excess pieces you don’t like. Just make sure not to cut the wire!

Now looking at your wreath, check which way around works best. There is always a top and a bottom of the wreath depending on your own preference and the shape you like best. Get your string and secure the string underneath the foliage and around the moss frame, creating a loop at the top and tie it really tightly to create your centre point on the wreath. Leave enough of a space to hang this string either onto a door knob, wreath hanger or whatever you are using to hang your wreath.

Secure the wire by tucking the end toward the greens so it won’t scratch your door or wall.
Take a step back and have a look ! If you want, you can “fluff” your wreath by gently pulling the branches. You can also take a moment to finish off your wreath here, too, by cutting off any pieces that are too long or too full.
STEP 4: ADD FINAL TOUCHES TO YOUR DIY WREATH
While you can add as many accessories as you want, we provide you with oranges, pine cones and cinnamon in our own wreath kits. You can simply use the left over reel wire or use the wire provided to wire your pieces.
To attach all of these extras, grab the wire and follow the pictures below.


Once you have the wire criss-crossed; twist the wire a couple of times to make sure the wire is really secured and centred on the cone. Do the same for both the oranges and the cinnamon bundles.


To attach your pine cones, lay them on the wreath to find the right position for it and attach each piece of wire through and around the greenery to secure it to your wreath. Tightly twist the wires together, tucking the ends so they won’t scratch your door or wall.
Repeat the steps, wiring on all your accessories (or baubles or whatever little thing you like) until you get the final look you like.
Design tip : Grouping together the cones in twos looks really well and similarly for the oranges in bunches of two or three. If you are adding extras, go for them in odd numbers (either 1, 3 or 5 pieces on the wreath)
The last step is to add in your bow or ribbon. Simply wire your bow or use the ribbon in your DIY Christmas wreath kit and secure it to the base around the base of the wreath by threading it through the foliage and twisting it to secure it at the end so it won’t budge. Fluff up your ribbon and there you go, your own DIY wreath!

COMPLETED DIY WREATH
To keep your wreath looking fresh, simply mist/spray with water every couple of days to prevent it drying out too quickly. If it is going to be really cold/frosty, you can bring it in overnight too.
Please remember that if you carefully remove/cut off your green foliage when you are fed up of looking at your dried out Christmas wreath hanging on your door, that you can reuse your moss base to make a new wreath in spring/summer etc. Simply wet your moss well (not saturated) and store it in a cool place in a bag out of direct sunlight .
I hope you find this useful !If you want to order your own DIY Christmas wreath kit , simply head on over to the shop here and purchase for delivery in Ireland nationwide.
Let me know how you get on and feel free to share your creativity on Instagram by tagging @flowersonfouracres
All the best,
Trisha.