
How to make your own dried flower wreath
How to make your own dried flower wreath
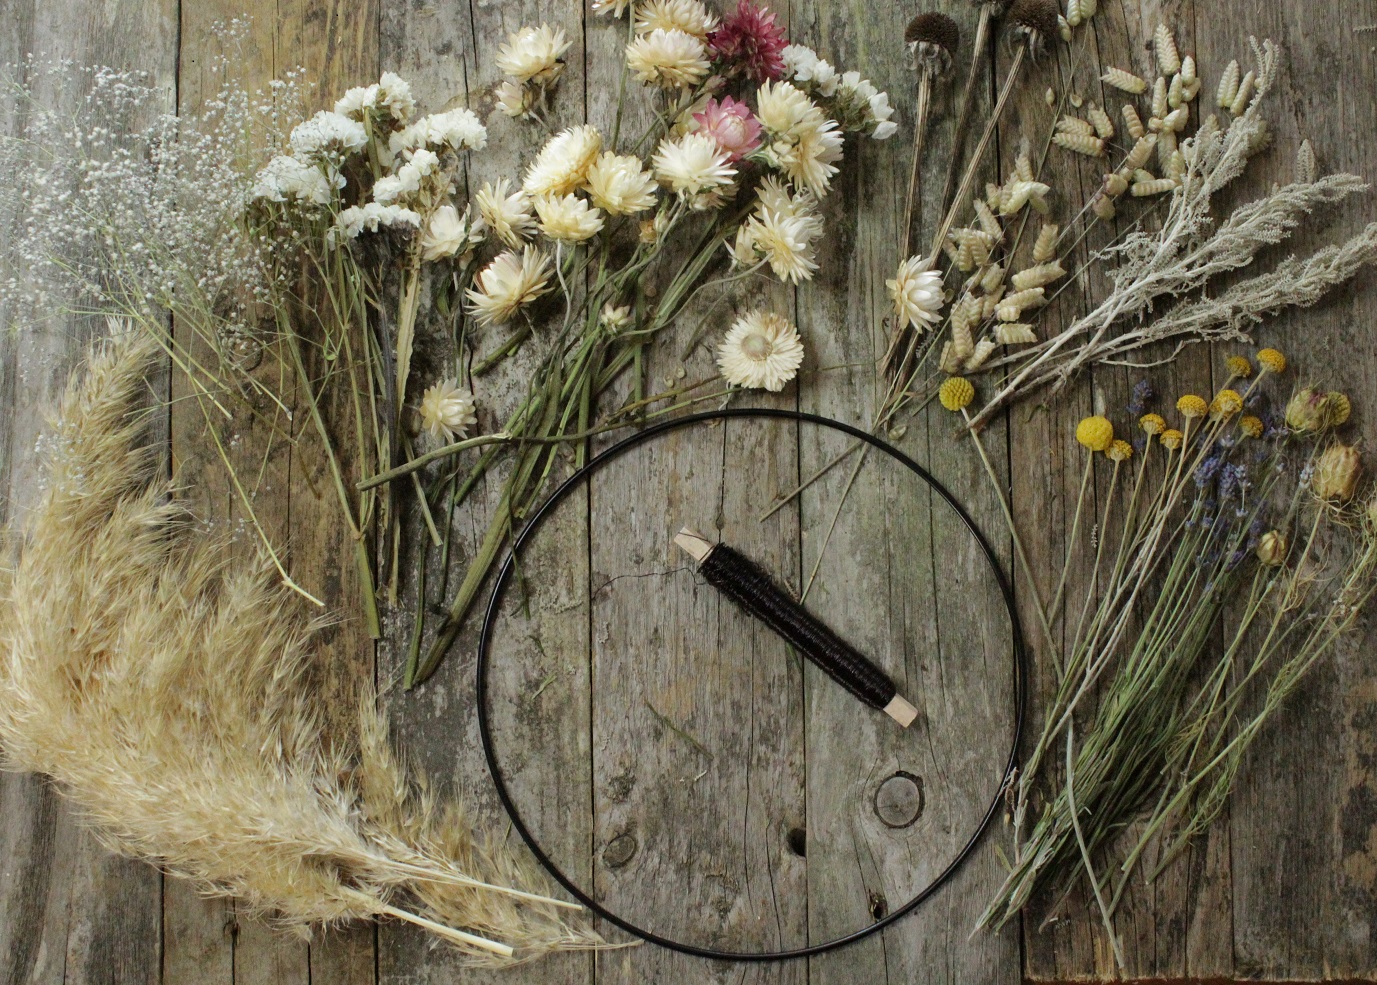
We are still waiting for the sun and heat to really get going here in Ireland so in the meantime , here is a simple guide to getting started with your own dried flower wreath. It is really fun to do with your family and kids and is something which you can then proudly display on your wall or a door. The materials you need are :
- # Simple wreath ring (or you can make your own using natural foraged bendy branches). Using a bigger straw filled or foraged branch base will give a 'fuller' appearance. The one I have chose here is a really simple one to start with but you can also choose straw filled wreath rings or willow which last for ages and look really pretty even if you decorate them half way round for example.
- # Florist wire (there are so many different wires to choose from but online this is called 'paddle wire or wreath wire). You can always use string/brown garden twine either but I always find wire is sturdier and easier to work with , hold and attach each bundle or group of flowers using the paddle. Again, there is lots of different types of wire that you can choose from. When you start wiring flowers (see my other free blog post on floristry wiring) there are lots of different gauges of wires to consider depending on what blooms you are working with.
- For more delicate stems, I also recommend using floral tape to wrap your bunches together before securing them to your wreath base. Floral tape is also called stem wrap and is papery to touch. Floral tape becomes sticky when you pull/stretch it and is a key piece of kit if you want to work with flowers for other projects in floristry.
- The other thing I also use in everything is floral glue. If you have not used it before, prepare to be delighted and excited. This stuff is magic and has transformed a lot of my fresh floral work too for pieces like corsages and flower crowns. This is floral glue. Magic stuff. So useful for dried flowers too. A toolkit staple. Easy to use and remove as well if you make a mess. I always do make a big mess though!
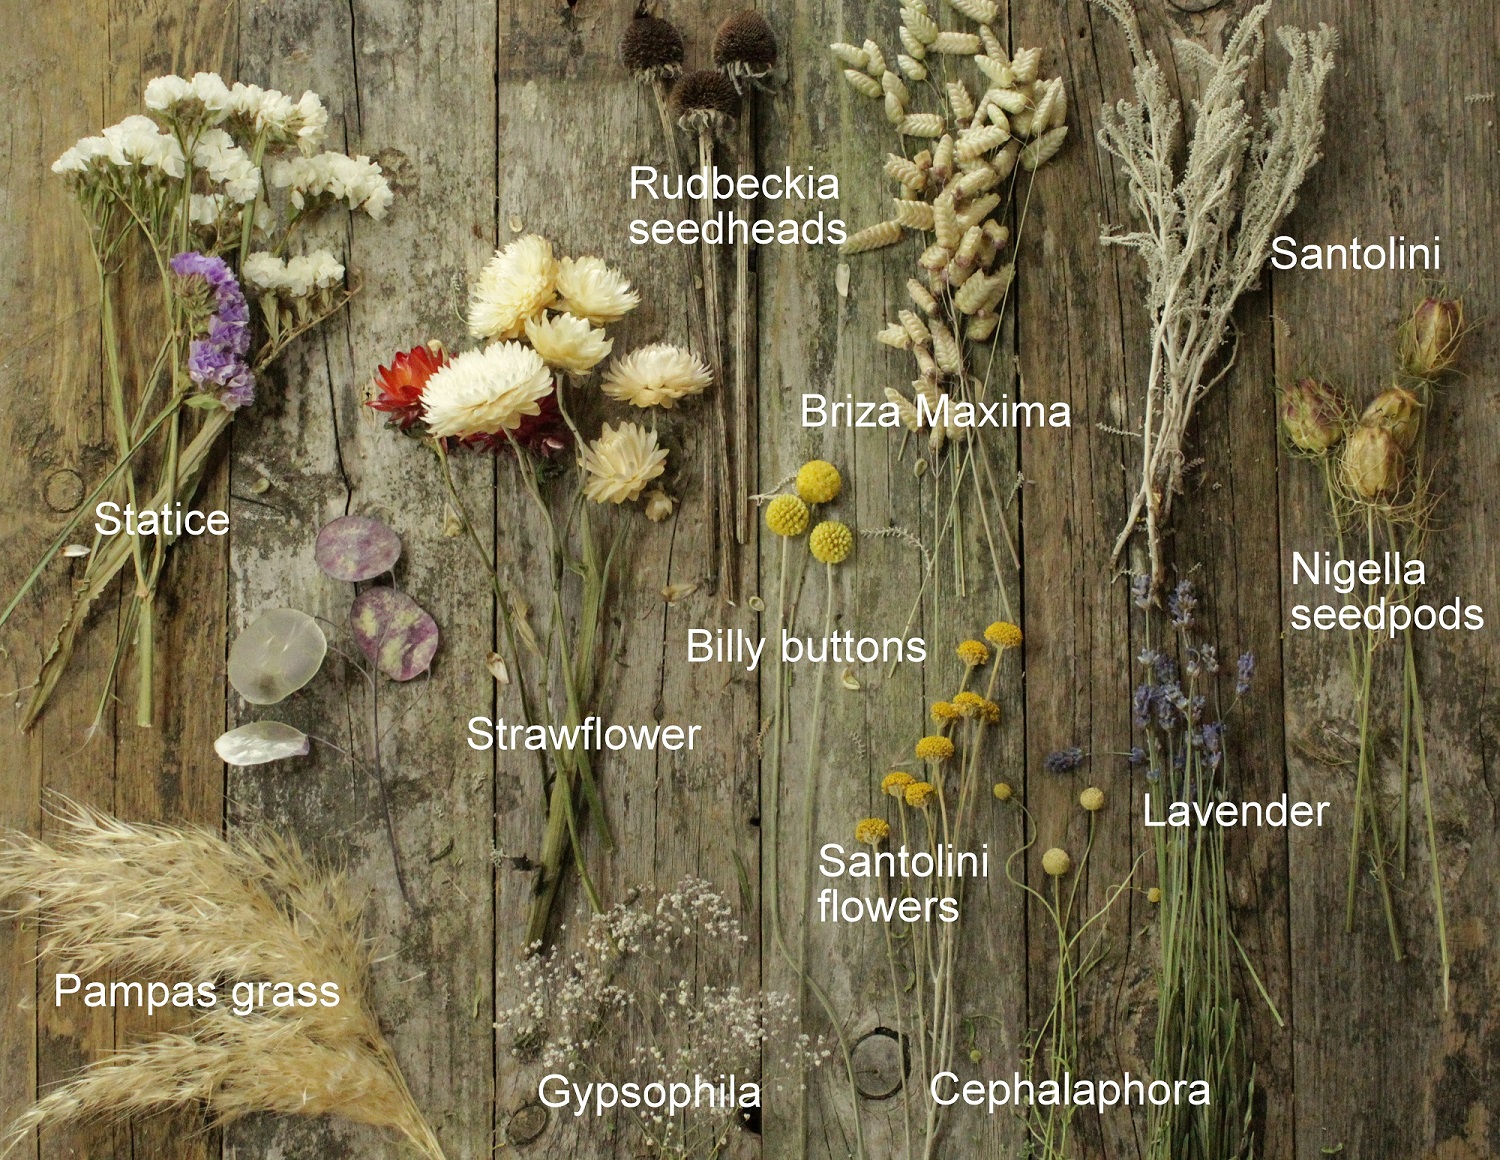
- A mix of dried flowers, grasses and foliage. See picture below for some names of common dried flowers. Choose plants and textures that match the style/palette you are hoping for. Grasses always add lovely texture and you can add in lots of other textures from dried foliage too like eucalyptus for example. The flowers and grasses that you use will really make your finished design. If you are just starting out or trying this for the first time, try drying out some flowers from your garden and cut a bunch of wild grasses for example to see how they dry. Test out different colours and textures and work with different materials to get the design and finish you want.
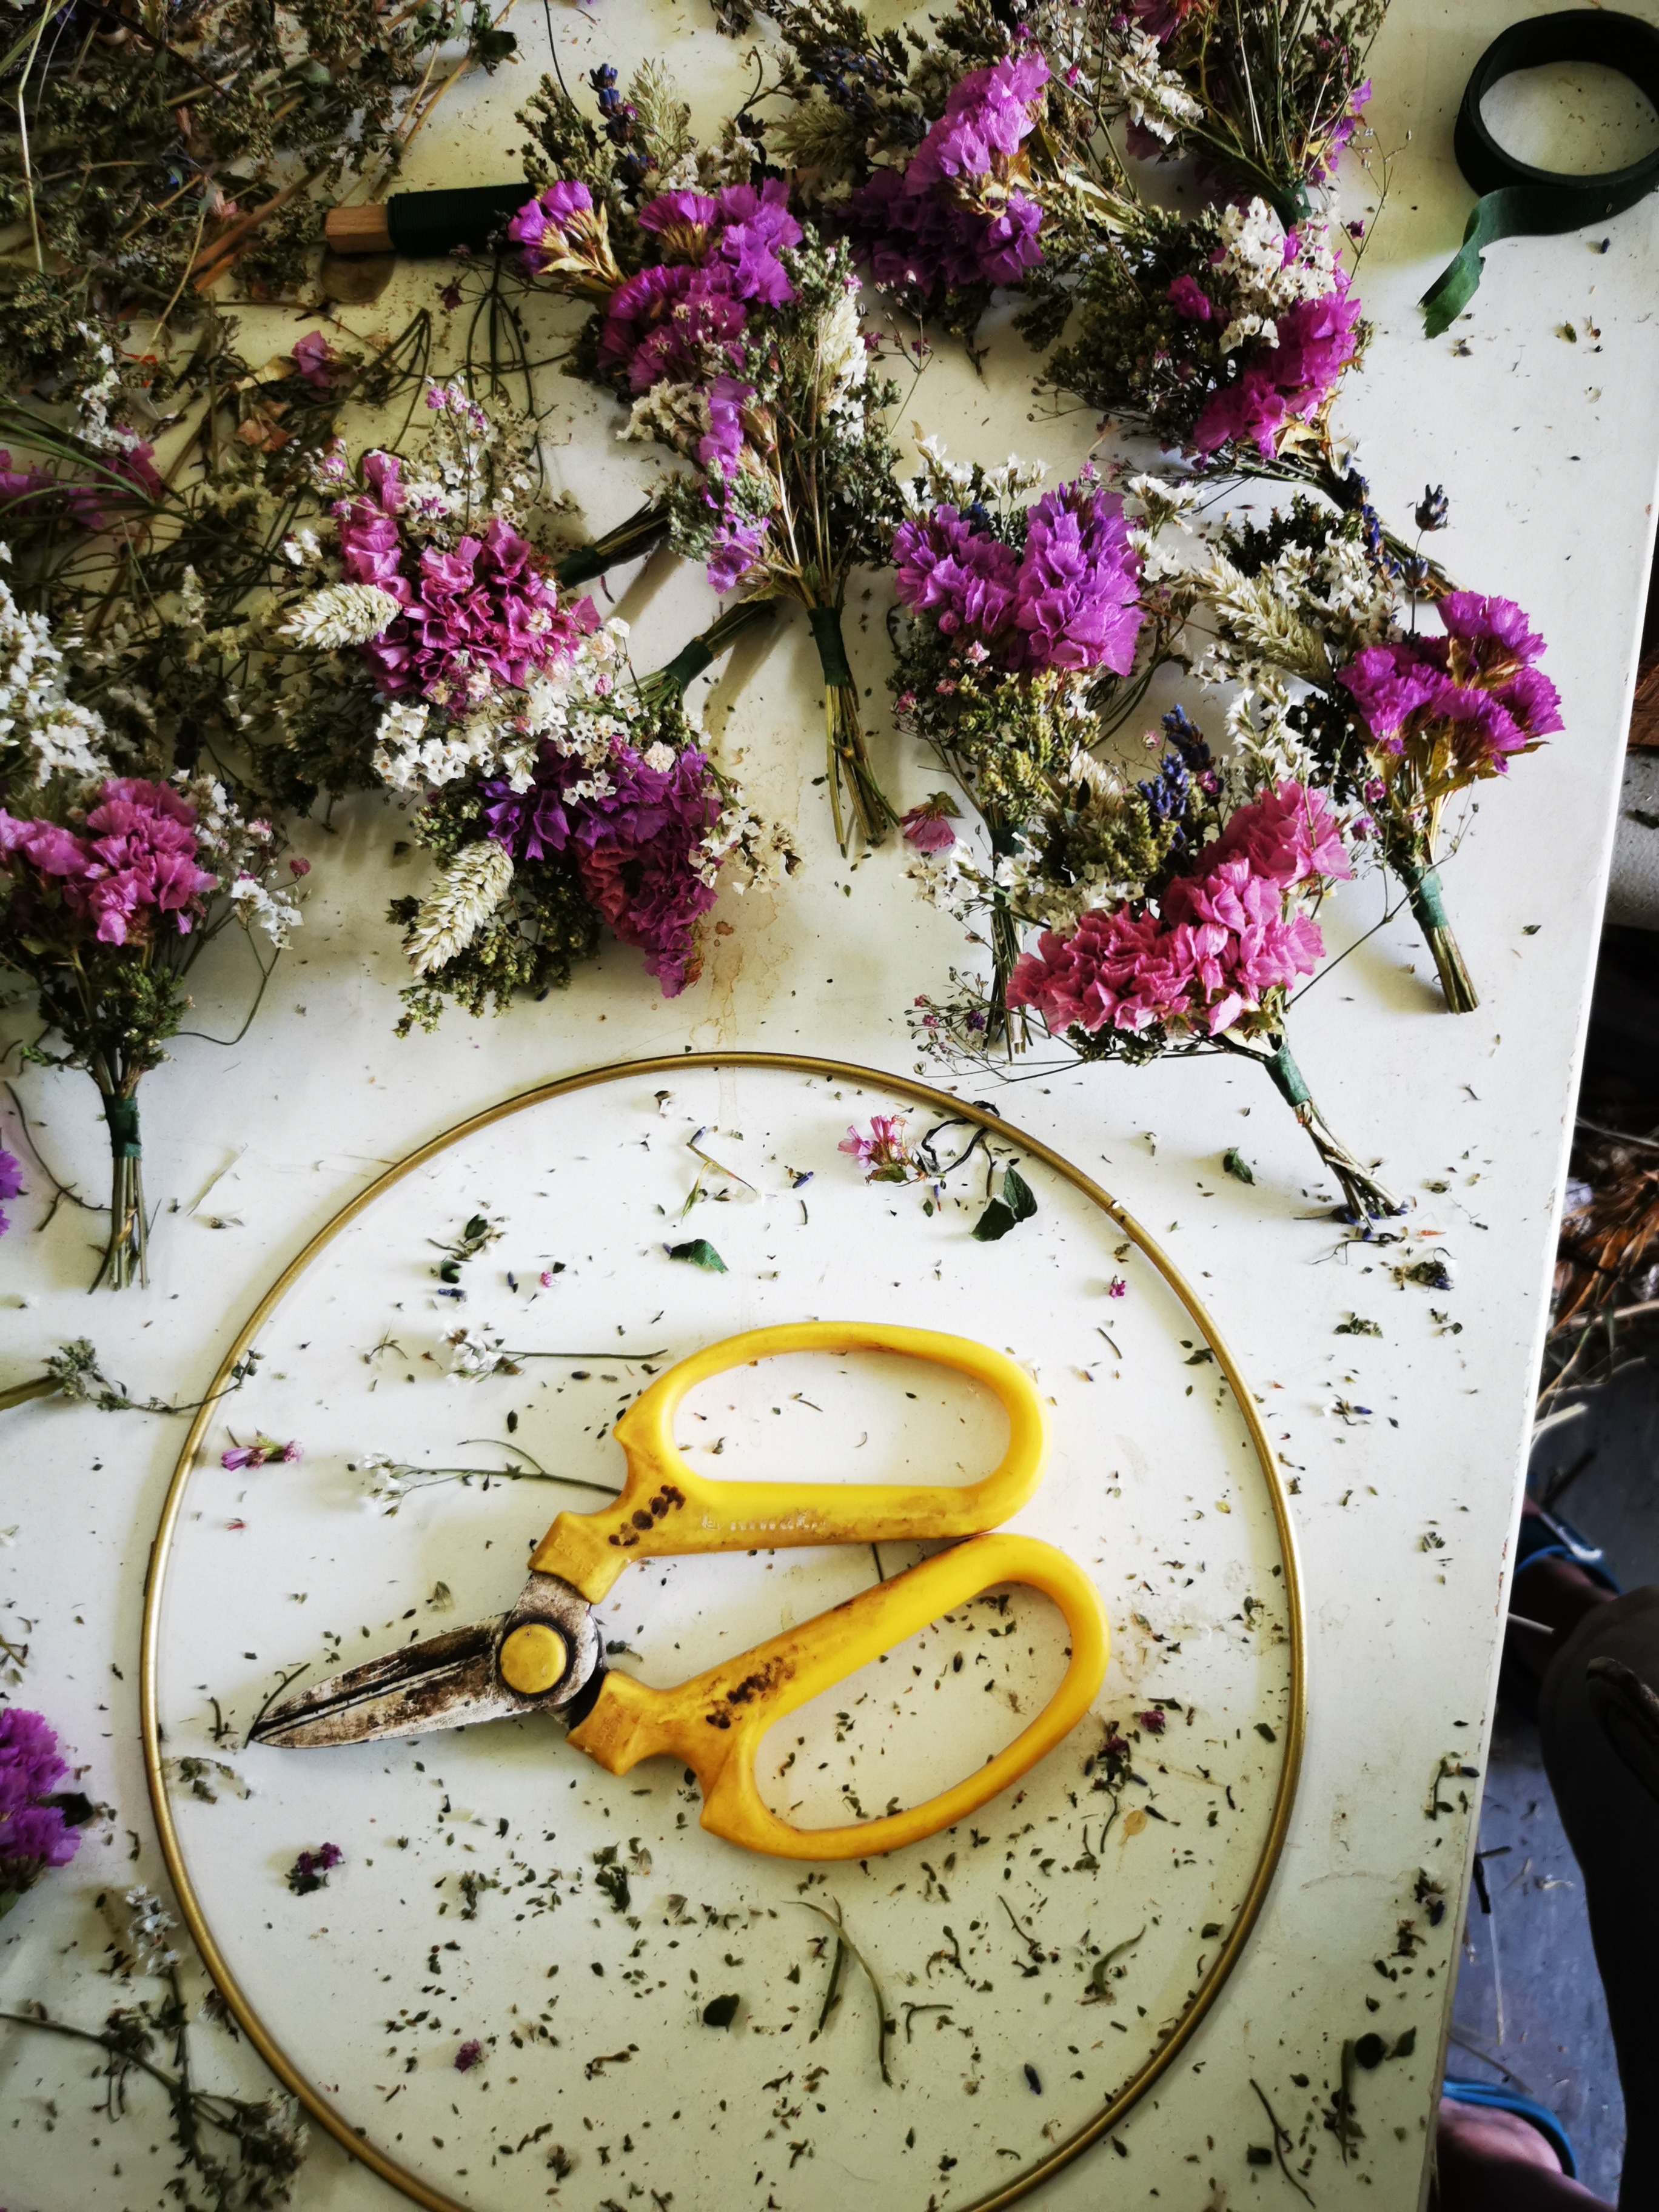
- # A strong scissors or pliers. If you can afford it, then I do recommend a good floristry scissors but its not really necessary. My first really good floristry scissors which I still use and love is my Niwaki one ; yes the very dirty snips in the picture below. It is super sharp and very comfortable in your hand when using it even for a long time. It is battered now but still a little workhorse. As with all things you get what you pay for so if you are planning on getting more into floristry then I highly recommend purchasing a good solid well reviewed one. Just bear in mind though that you may need stronger garden pruners or secateurs to cut the woodier or thicker stems if using! Don't use your scissors to cut wire by they way. Use a household pliers or simple wire cutters for that.
- String, ribbon or other material to hang your wreath.
- Optional: A big steaming hot cup of tea or coffee or a nice glass of red and some chocolate!
#affiliate ad# links
Why dried flowers?
Dried flowers' used to remind me of dusty 1980’s floral decorations and not something that I thought of as cool or trendy but dried flowers' are definitely having a moment and I have total appreciation now and I love designing and creating with them. Dried flowers' extend the life of flowers and are a very sustainable way of enjoying flowers even in the darkest winter months of the year when blooms and colour are scarce.
I now harvest and dry a wide mix of flowers and I have tried my hand at drying most of them to see what worked and what didn’t. Some were a major flop for drying but harvest times, harvest stage and flower variety really do matter when considering drying flowers. Humidity is the bain of my life especially the last couple of years when the weather and summer has been so wet. In any case, some of my solid favourites are:
- Statice (Limonium) lots of different varieties and colours
- Strawflower (Helichrysum) - a special mention for strawflowers is required as they grow into papery magical beauties which I never tire of working with!
- Love in a mist (Nigella) seed pods
- Grasses : Pampas, wild grasses, Quaking grass (Briza Maxima) . From one pampas stem you can break off lots of smaller stems and use those to make your smaller bunches. It can be pricey for one stem.
- Honesty (Lunaria)
- Baby’s breath (Gypsophila)
- Billy Buttons (Craspedia)
- Cotton Lavender (Santolina)
Some flowers dry much better than others but this year, I dried some ‘weeds’ aka wildflowers. Many of our own native plants are overlooked but can be really beautiful when dried. My favourite discovery this year was dock leaf seed heads which dried to a beautiful rich brown. I air dry the majority of my flowers (tying them in small bundles with string and hanging them upside from a ceiling in a dry dark room. To dry smaller blooms, fruit, herbs and confetti petals, I used my reliable Stockli dehydrator until this year and now I use the Sousvide model and a hanging drying rack which is also super handy and space saving. The Sousvide dehydrator is also great for drying oranges and fruits and doing a few layers altogether. I also use this for drying out lots of my own household fruit like apples!
To get going :
- Start by laying out all your dried flower materials in bundles so everything is to hand before you start. Trim and clean the bottom of the stems to your desired lengths and to make it easier to work with.
- Consider where you are going to hang your wreath and surrounding colours' and accessories like matching ribbon or string to tie it off.
- Then think about what type of design you would like and whether it is a full circular design or a half moon crescent shape. If using a half moon shape, you can tilt it to the right or to the left and add lovely flourishes to either end of your arrangement with longer stem’s like Pampas or grasses to create a bigger wider design. Experiment and enjoy and you will be surprised what you can create!
There are two different methods to make a dried flower wreath;
1. Put together several little bundles of flowers, grasses and seed heads and cut to around 10-12cm in length and tie them off. You can follow a set colour pattern or design by simply repeating the same bundle each time. Each bundle is then secured one on top of the other (making sure to place each following bundle over the stem of the previous bundle without covering the actual bloom heads too much). This method works great if you like consistency of pattern and uniformity. You can use string or wire to tie these together. You will need at least 12-15 bunches depending on the size of your wreath base and size of your bunches. Excuse the mess and definitely don't let your snips get as dirty as my one here !
2. The method I prefer the most is to add little and individual stems or bundles as I go. I find it easier to adjust shape and colour and add texture in this way and add little pops of interest along the circular design. I also like this method as I can easily add extra little bits at the end if I want. with
3. Attach the wire to the wreath base. Make sure it is tied securely. Then start by placing your bunches on the wire. Place the first bunch down on your wreath base and wrap the wire over the stems of the flowers or bunches (outside to inside and under the wreath base) is the easiest way to do this. By rolling wire over the top and pulling out underneath the wreath base, you can easily tighten your bunches one ; be careful not to pull too tight though as you may damage the stems and they can break easily.
4. Create or grab your next bunch and place the stem/bloom heads on top of the previous bunches of dried flower stems (so you cant see the bottom of the stems). Repeat the process until the end.
5. The final tie off is a bit trickier but best to go with a smaller bundle and tie if off with the wire, carefully to make sure you don't break any stems. For the finishing 'gaps' in your design just grab a few matching stems and place them into your design. As long as your bunches are securely tied with the wire or string, you can easily ease additional single stems into your design. Hold up your wreath onto the wall and visually check for gaps. Check for the best way to display it and where you will add in your string/ribbon or wall hook.
Whichever method you prefer is completely up to you. If you would like the convenience of just getting everything you need to make a wreath delivered to your door, we will have our wreath kits up on the webshop in a few weeks when our new stock is fully dried but otherwise, you can most likely source dried flowers from your local flower farmer. In Ireland, just check out the flower farmers of Ireland website.
How long will dried flowers last?
Dried flower wreaths can last for many months and even years if they are properly cared for. To keep them at their best, they should be hung in a cool, dry place, away from moisture and humidity and out of direct sunlight. As with all natural things, their colour will fade over time.
Can do I dry my own flowers ?
The answer is yes but there are some flowers which dry better than others. The easiest way to dry flowers is to simply cut them at the correct time of blooming , early morning or late evening when they are dry. Hydrate/condition in water for at least 12 -24 hours and then hang upside in bundles from the stem. Dry out of direct sunlight and away from moisture to ensure they keep their colour and do not start to rot. There are other methods like using glycerine, silica and semolina but thats a different blog post.
For smaller flowers and those with very delicate stems, I use a simple drying rack like this one below. You can fit lots on it and its super easy to use and then store away.
#Dried Flower hanging rack - I use this rack for drying out petals for dried flower confetti and also for the smaller stems like gomphrena, rose buds, herbs like oregano and mint and lavender. It is easily folded up and stored away. .